Table of Contents
MIDIbox TIA
What is it?
The Television Interface Adaptor (TIA) is the custom chip that is the heart of the Atari 2600
game console, generating the screen display, sound effects, and reading input controller.
- Stella = Name (by its maker) of Atari hardware design engineer Joe Decuir's bicycle
- TIA = Television Interface Adapter
Where do i find this chip?
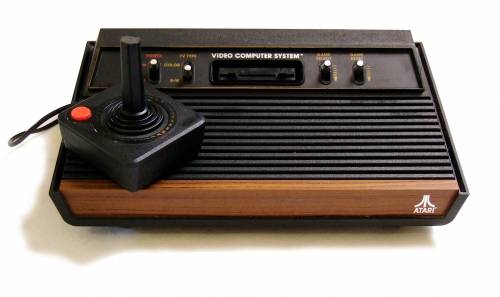
You can easily find an old and used console on the web. Atari 2600 on eBay
Atari 2600 Models and Clones
On the motherboard:

Have a look at 2600 Connection site to find it.
TIA = “Stella” = MM9031N = UM6525N = CO10444 = CO10444D (NTSC, U.S.A. & SECAM, France)
TIA = “Stella” = UM6526P1 = CO11903 (PAL, Europe + Australia + most of the rest of the world)
Why? and "What would be the point?"
I'm probably a bit nostalgic for a time I played the game console in the living room of my parent.
Need electronic sounds that have traumatized my childhood.
Midibox is the best way to integrate these original sounds in electronic music environment.
The point is it's fun, i can do it, it sounds great, it has a unique sound.
Don't think it could only be useful for making chip-tunes/8-bit music, that's a limited horizon.
I love the sounds of sound chips and game controllers from the 70/80/90's but I don't make (or particularly like) video game music.
I make techno (minimal) and find the sounds from this source are perfect for that…
MIDIbox TIA Module
Introduction
The TIA is an MOS integrated circuit designed to interface between an eight (8) bit microprocessor and a television video modulator and to convert eight (8) bit parallel data into serial outputs for the color, luminosity, and composite sync required by a video modulator.
This circuit operates on a line by line basis, always outputting the same information every television line unless new data is written into it by the microprocessor.
When I started this project, there were two main structures of a MIDIbox, SEQ or SYNTH oriented.
My conclusion was that the skeleton and features of MB-SID version 1 were best suited to the TIA and its own possibilities.
Atari 2600 References
Atari 2600 hardware schematics PAL/NTSC
TIA technical information
TIA schematics
Firmware version 1 is devoid of Control Surface.
“Full CS looks great, like on SID, but is also more expensive to build
I think your solution with a controller patch works great, it's easy and intuitive to have it all there on the screen”Eptheca
… Yes it's my choice 
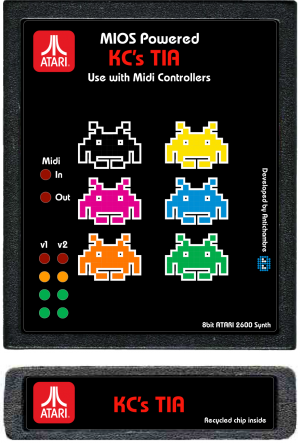
I decided to case it in a cartridge, because it makes this project a tiny one, easy to build and cheap. In short, an accessible start-up project, which need reasonable time to realize, share and present correctly.
So I focused all my attention to the Software Engine adaptation and the implementation of Sysex and CC#.
Moreover, this MaxMsp Patch has been declined in Midi Device for Live with Max4Liveableton , and now I access for complete automation of the box.
Max and Live do not lack of alternatives in terms of CS. Both Standalone and Device manager are iPad ready.
Like the SID Module, TIA is connected with a serial link to port J10 of the Core module via shiftregisters.
Module use 5v core power supply.
Firmware is only made for 18f4685. We need enough space in flash for the sampler option.
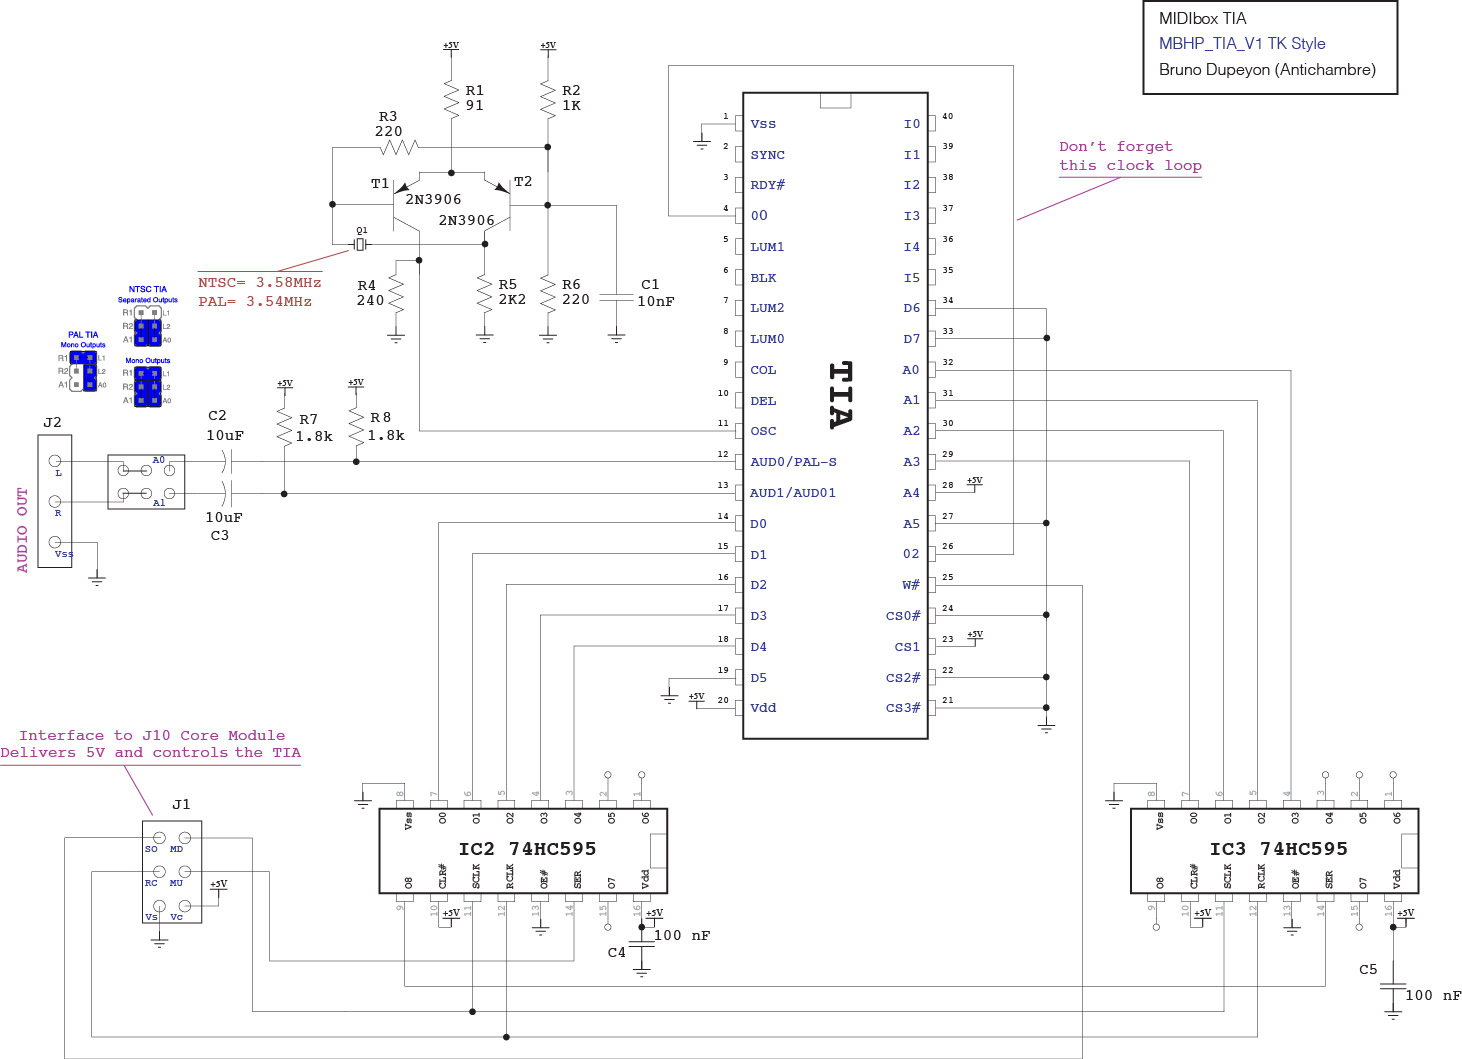
Like the Pokey, TIA is clocked to 3.58MHz(NTSC) or 3.54MHz(PAL). You can use an oscillator but my choice was to recycle the console parts, like Xtal and the couple of transistors which are on the atari motherboard.
TIA and Shiftregisters
As seen in “How>Registers Address”, we don't need to use all adress and data pins.
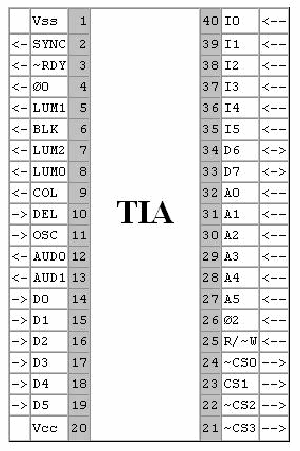
Pins A5, D5, D6, D7, CS0#, CS2#, CS3# must be grounded.
Pins A4, CS1 must be connected to 5V.
We use only Address lines A0-A3, Data lines D0-D4 and WR# line.
Divided by 3 Clock output 00 must be connected to input 02.
Schematic
Parts List
| Part | Value | Type | Qty | Mouser Ref |
|---|---|---|---|---|
| IC1 | TIA | UM6826P1/C010444D | 1 | / |
| IC2-IC3 | 74HC595N | 74HC595N | 2 | 595-SN74HC595N |
| T1,T2 | 2N3906 | transistor-pnp | 2 | 750-2N3906-G |
| Q1 | 3.58Mhz | XTAL | 1 | 520-HCU357-17DNX |
| R1 | 91 | resistor | 1 | 291-91-RC |
| R2 | 1K | resistor | 1 | 291-1K-RC |
| R3-R6 | 220 | resistor | 2 | 291-220-RC |
| R4 | 240 | resistor | 1 | 291-240-RC |
| R5 | 2k2 | resistor | 1 | 291-2.2K-RC |
| R7-R8 | 1K8 | resistor | 2 | 291-1.8K-RC |
| C1 | 10nF | Capacitor Ceram | 1 | |
| C2-C3 | 10µF | Capacitor Pol | 2 | 647-USV1V100MFD |
| C4-C5 | 100nF | Capacitor Ceram | 2 | 80-C412C104K5R |
| J1 | CORE CON | JP3Q | 1 | |
| J2 | AUD-CON | JP2E | 1 | |
| J3 | AUD-CONF | JP3Q | 1 |
PCB files
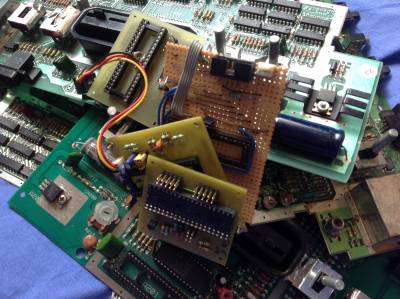 I made a lot of breadboards and stripboards before first cartridge prototype.
It's really easy but i prepared an Eagle Project for people who want design .
Maybe it will be usefull to replace the clock section by an Oscillator.
*.sch is ready, *.brd is consistent but in airwires state… If somebody have done(or wanna do) this work, i will be happy to publish it and complete this section.
.
TIA Setup
Necessary Hardware:
- MIDIbox CORE PIC 8bit.Remember, Only for 18F4685.
- MIDIbox TIA Module or equivalent.
Hardware Options
- Up to 8 BankSticks. 32K and 64K could be mixed (4 Banks per BS with 64 or 128 presets per Bank).
Bank Name store and retrieve. - LED Meter 2*4(cartridge version).
Connection to Core
| TIA Module pin | Core pin | Pic pin nr |
|---|---|---|
| J1:Vs | ground | - |
| J1:SO | J10:SO | 24 |
| J1:RC | J10:RC | 23 |
| J1:MU | J10:MU | 29 |
| J1:MD | J10:MD | 28 |
| J1:Vc | +5v | - |
Features
Due to the TIA capabilities, the MIDIbox software provides almost the entire features of the synth engine. And it do it fine 
- Modulation Wheel.
- After-Touch.
- Volume for each Voice.
- Waveform select for each Voice.
- Transpose for each Voice.
- Pitch Range & Pitch Bend for each Voice.
- Delay for each Voice.
- Portamento for each Voice.
- Independents Constant Time Slide enable for portamento.
- Arpeggiator for each Voice
- Independents MIDI Sync Enable for LFOs/ENVs/ARPs.
- Master Volume.
- 2 independents Velocities (with CC# or/and Amplitude assign).
- 2 full independents and dedicated Envelopes with Modulation Type, MIDI Sync and curve assign.
One by Voice (No internal envelope in a TIA). Assignable to Amplitude or pitch. - 4 full independents LFOs with MIDI Sync.
- 2 full independents ENVs with MIDI Sync.
- 6*4 Matrix, LFOs/ENVs to amplitude or pitch.
- Keyboard Extended Option with note offset and note length values.
- GSA.
- MIDI Send Clock.
Synchronization
The 3.58 MHz oscillator also clocks a divide by three counter on this chip whose output (1.19 Mhz) is buffered to drive an output pad called 00. This pad provides the input phase zero clock to the microprocessor which then produces the system 02 clock (1.19 Mhz).
Data and addressing
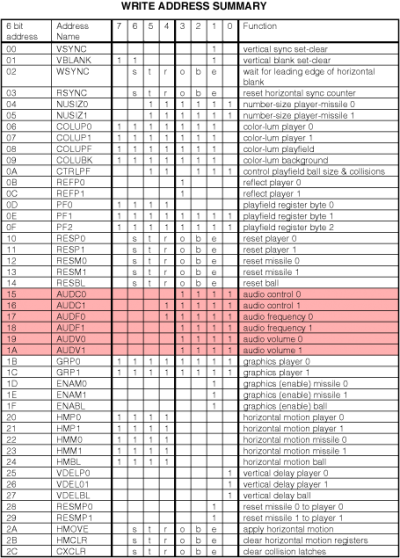
Registers on this chip are addressed by the microprocessor as part of its overall RAM-ROM memory space. The attached table of read-write addresses summarizes the addressable functions. There are no registers that are both read and write. Some addresses however are both read and write, with write data going into one register and read data returning from a different register.
If the read-write line is low, the data bits indicated in this table will be written into the addressed write location when the 02 clock goes from high to low. Some registers are eight bits wide, some only one bit, and some (strobes) have no bits, performing only control functions (such as resets) when their address is written.
If the read-write line is high, the addressed location can be read by the microprocessor on data lines 6 and 7 while the 02 clock is high.
Two (2) independent audio generating circuits are included, each with programmable frequency, noise content, and volume control registers.
Voice 1 is Aud0 and Voice 2 is Aud1 in the Stella programmer's guide.
Audio Circuit
Synthesis:
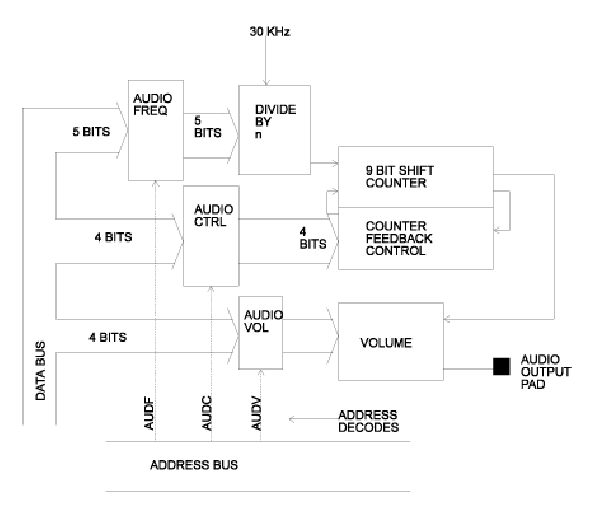
There are two audio circuits for generating sound. They are identical but completely independent and can be operated simultaneously to produce sound effects through the TV speaker. Each audio circuit has three registers that control a noise-tone generator (what kind of sound), a frequency selection (high or low pitch of the sound), and a volume control.
Each audio circuit consists of parts described below:
Audio Output:
A few references of TIA have a separated output for each voice (pin 12 & 13).
In General, the two voices are added to the same output (pin 13), pin 12 became a special pin, is used for video carrier frequency modulation.
I think it's the oldest consoles(Six Buttons Model) which has separated outputs.
Separated outputs TIA models:
- C010444D-19
One Output TIA models:
- UM6526P1
- AMI C011903
Registers Address
Those two audio generators use 6 registers:
- AUDCx (4bit), Waveform control(x2)
- AUDFx (5bit), Pitch control(x2)
- AUDVx (4bit), Volume control(x2)
AUDx registers adresses start @ 0x15 (21)
0x15= 010101
0x16= 010110
0x17= 010111
0x18= 011000
0x19= 011001
0x1a= 011010
So we need 4 bit of address only. And 5 bit max for data (AUDFx).
Data bit 7,6,5 and Adress bit 5 are cleared. Adress bit 4 is set.
Waveform & Noise Control:
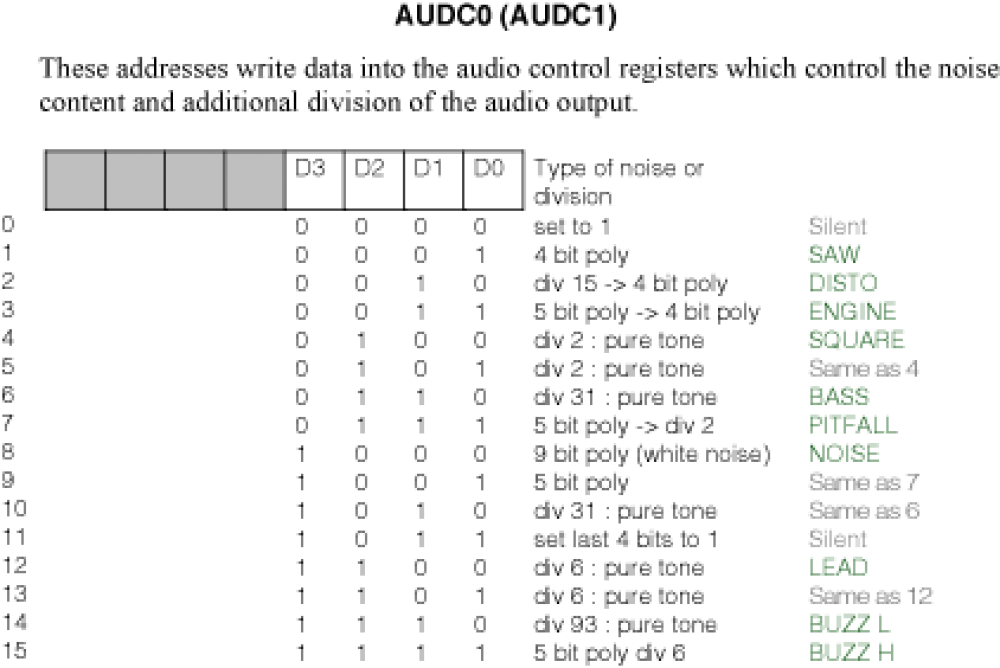
The noise-tone generator is controlled by writing to the 4 bit audio control registers (AUDC0, AUDC1). The values written cause different kinds of sounds to be generated. Some are pure tones like a flute, others have various “noise” content like a rocket motor or explosion.
This circuit contains a nine bit shift counter which may be controlled by the output code from a four bit audio control register(AUDC), and is clocked by the frequency select circuit. The control register can be loaded by the microprocessor at any time, and selects different shift counter feedback taps and count lengths to produce a variety of noise and tone qualities.
Even though the TIA hardware manual lists the sounds created by each value, some experimentation will be necessary to find “your sound”.
These are 16 in number (4 bits). But some are the same or are silent.
So only 10 waveforms are available.
Pitch Control:
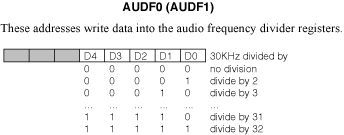
Frequency selection is controlled by writing to a 5 bit audio frequency register (AUDF0, AUDF1).
The value written is used to divide a 30KHz reference frequency creating higher or lower pitch of whatever type of sound is created by the noise-tone generator.
Clock pulses (at approximately 30 KHz) from the horizontal sync counter pass through a divide by N circuit which is controlled by the output code from a five bit frequency register (AUDF). This register can be loaded (written) by the microprocessor at any time, and causes the 30 KHz clocks to be divided by 1 (code 00000) through 32 (code 11111). This produces pulses that are digitally adjustable from approximately 30 KHz to 1 KHz and are used to clock the noise-tone generator.
By combining the pure tones available from the noise-tone generator with frequency selection a wide range of tones can be generated.
On PAL/SECAM Atari models, sounds will drop a little in pitch (frequency) because of a slower crystal clock.
5 bits 
Value needs to be reversed!
Volume Control:
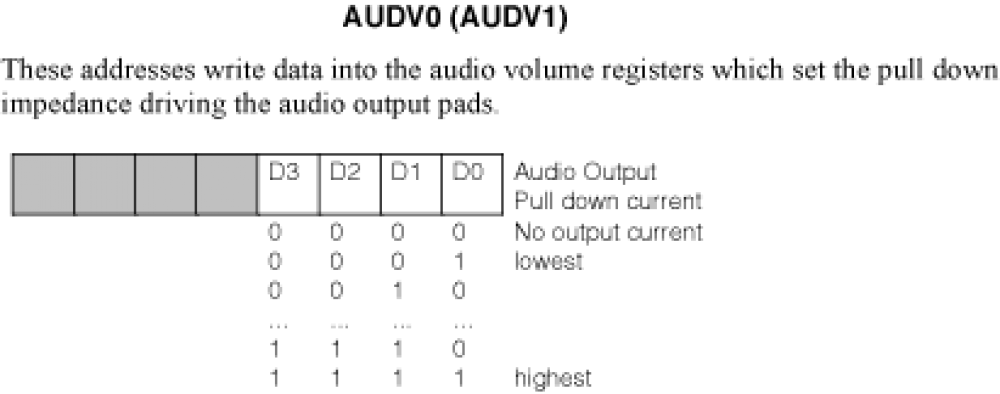
Volume is controlled by writing to a 4 bit audio volume register (AUDV0, AUDV1).
The shift counter output is used to drive the audio output pad through four driver transistors that are graduated in size. Each transistor is twice as large as the previous one and is enable by one bit from the audio volume register (AUDV). This audio volume register may be loaded by the microprocessor at any time. As binary codes 0 through 15 are loaded, the pad drive transistors are enabled in a binary sequence. The shift counter output therefore can pull down on the audio output pad with 16 selectable impedance levels.
Writing 0 to these registers turns sound off completely, and writing any value up to 15 increases the volume accordingly.
16 levels (4 bits).
Precompiled setups in the FW:
 o setup_tia_base.hex        (TIA Base setup for Module)
 o setup_tia_cartridge.hex   (TIA setup for Cartridge version)
Details (What have been done?)
Amplitude Specifics
Unlike the SID, TIA does not have internal gate and envelope.
So I wrote a specific section for TIA Amplitude (volume) in tia_sw.inc.
TIA_SW_Amp function handles AUDVx registers, calculates Amplitude from Parameters:
- Master Volume.
- Voice Volume.
- GSA
- Velocity.
- Dedicated Envelope (to Amp).
- Modulation Matrix (to Amp).
Copy_Amp, Engine Value to TIA register (done after all other amplitude process) :
- 0 ≤ AUDVx ≤ 31(4bit)
- 0 ≤ AMP ≤ 0x7f(7bit)
AUDVx = AMP » 3
Amplitude:Volumes
Master Volume(CC#7) allow to increase or decrease general volume and keep the relative mixing between the two Voices (CC#9-10).
With V12 Volume (CC#8), single Volumes(CC#9-10) will be linked and equals.
- 0 ≤ Vx_VOLUME ≤ 0x7f(7bit)
- 0 ≤ MASTER_VOLUME ≤ 0x7f(7bit)
AMP = Vx_VOLUME * MASTER_VOLUME / 127
CC # | Hex | Description                                  | Range       | Reset
=====+=====+==============================================+=============+======
   7 | 07h | Master Volume (00h-7Fh)                      |  0-127: val |  127
-----+-----+----------------------------------------------+-------------+------
   8 | 08h | Voice 1/2 Volume                             |  1-127: val |  127
   9 | 09h | Voice 1 Volume                               | see above   |  127
  10 | 0Ah | Voice 2 Volume                               | see above   |  127
-----+-----+----------------------------------------------+-------------+------
Amplitude:Vx Gate
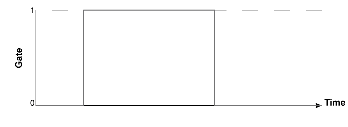
I recreated the Gate and its GSA (CC#19-21) feature by software.
Gate Stay active option maintain the Gate High and allow to dig in Amplitude(useful when depth velocity or envelope are negatives).
GSA in Voice Mode Controller:
CC # | Hex | Description                                  | Range       | Reset
=====+=====+==============================================+=============+======
  19 | 13h | Voice 1/2 Mode                               |             |    0
     |     |   Bit 0: Gate Stay Active on/off             |             |
  20 | 14h | Voice 1 Mode                                 | see above   |    0
  21 | 15h | Voice 2 Mode                                 | see above   |    0
-----+-----+----------------------------------------------+-------------+------
I add a fade out section to avoid 'clicks' on abrupt amplitude fall down.
Adjust it in setup_tia_*.asm
    ;; Adjustable Gate fade out option:
    ;; to avoid click when envelope is off or envelope release is null.
    ;; Uses USER_Timer period N * 819 (us), default N=2 (1.638ms).
#define DEFAULT_TIA_GATE_FADEOUT   2
Amplitude:Vx Velocity
Velocity response for both voices Amplitude(CC#19-21). With optional CC# Assign(CC#43-45).
It will play Init value(CC#4-6) if Velocity input is less than it.
- 0 ≤ Vx_LAST_VEL ≤ 0x7f(7bit)
- 0 ≤ Vx_INIT_VEL ≤ 0x7f(7bit)
If Vx_LAST_VEL ≤ Vx_INIT_VEL then Vx_LAST_VEL = Vx_INIT_VEL
A negative depth value(CC#13-25) will reverse the effect, harder you play, lower it sounds.
It will play Init value(CC#4-6) if Velocity input is less than it.
- GSA Off
- 0 ≤ Vx_LAST_VEL ≤ 0x7f(7bit)
- - 0x3f(6bit) ≤ Vx_DEPTH_VEL ≤ + 0x3f(6bit)
If Vx_DEPTH_VEL > 0 then
AMP = AMP * [ ( Vx_LAST_VEL / 127 ) * ( Vx_DEPTH_VEL / 63 ) ]
If Vx_DEPTH_VEL < 0 then
AMP = AMP * [ 1 - [ ( Vx_LAST_VEL / 127 ) * ( |Vx_DEPTH_VEL| / 63 ) ] ]
Velocity to Amplitude Enabler in Vx Mode Controller:
CC # | Hex | Description                                  | Range       | Reset
=====+=====+==============================================+=============+======
  19 | 13h | Voice 1/2 Mode                               |             |    0
     |     |   Bit 3: Velocity to Amplitude on/off        |             |
  20 | 14h | Voice 1 Mode                                 | see above   |    0
  21 | 15h | Voice 2 Mode                                 | see above   |    0
-----+-----+----------------------------------------------+-------------+------
Velocity Controllers :
CC # | Hex | Description                                  | Range       | Reset
=====+=====+==============================================+=============+======
   4 | 04h | Voice 1/2 Velocity Init Value                |  0-127: val |    0
   5 | 05h | Voice 1 Velocity Init Value                  |             |    0
   6 | 06h | Voice 2 Velocity Init Value                  |             |    0
-----+-----+----------------------------------------------+-------------+------
  13 | 0Dh | Voice 1/2 Velocity Depth                     |  0- 63: neg |  127
     |     | negative depth (0-63) inverts the effect     |     64: off |
     |     |                                              | 64-127: pos |
  14 | 0Eh | Voice 1 Velocity Depth                       |             |
  15 | 0Fh | Voice 2 Velocity Depth                       |             |
-----+-----+----------------------------------------------+-------------+------
  43 | 2Bh | Voice 1/2 Assign Velocity to Controller      |     0: off  |    0
     |     |                                              | 1-127: Ctrl |
  44 | 2Ch | Voice 1 Assign Velocity to Controller        | see above   |    0
  45 | 2Dh | Voice 2 Assign Velocity to Controller        | see above   |    0
-----+-----+----------------------------------------------+-------------+------
Velocity and GSA behaviour :\\
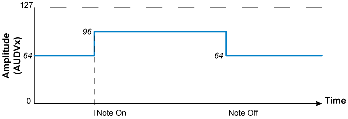
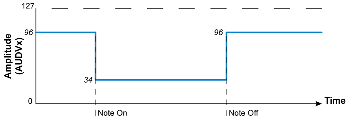
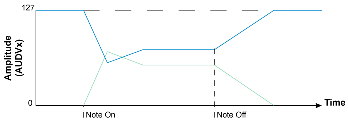
With GSA enabled (CC#19-21), in accordance with Depth sign (CC#8-10), velocity value will increase/decrease Amplitude value on noteOn and restore normal value on noteOff.
- GSA On
- 0 ≤ Vx_LAST_VEL ≤ 0x7f(7bit)
- - 0x3f(6bit) ≤ Vx_DEPTH_VEL ≤ + 0x3f(6bit)
If Vx_DEPTH_VEL > 0 then
AMP = AMP + ( 127 - AMP ) * [ ( Vx_LAST_VEL / 127 ) * ( Vx_DEPTH_VEL / 63 ) ]
If Vx_DEPTH_VEL < 0 then
AMP = AMP - AMP * [ ( Vx_LAST_VEL / 127 ) * ( |Vx_DEPTH_VEL| / 63 ) ]
e.g. Positive Velocity Depth.
- GSA On
- AMP = 64
- Vx_DEPTH_VEL = + 32
- Vx_LAST_VEL= 127
AMP = 64 + ( 127 - 64) * [ ( 127 / 127 ) * ( 32 / 63 ) ] ≈ 96
e.g. Negative Velocity Depth.
- GSA On
- AMP = 96
- Vx_DEPTH_VEL = - 63
- Vx_LAST_VEL= 82
AMP = 96 - 96 * [ ( 82 / 127 ) * ( 63 / 63 ) ] ≈ 34
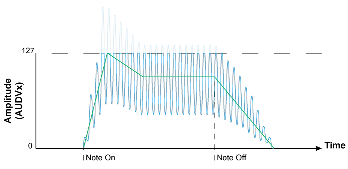
Amplitude:Vx Envelope
TIA needs Envelopes to be a real synth and have its behaviour…
I chose to decrease LFOs number by 2 and add one dedicated envelope per voice.
Ok now, we've got 4LFOs and 4 ENVs…
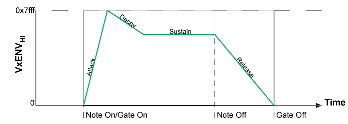
For each 2 dedicated Envelopes (VxENV) :
- Envelope to Amplitude Enabler(CC#19-21).
- Depth parameter (CC#49-51).
- Curve Bender parameter (CC#52-54).
- Classic parameters Attack (CC#55-57), Decay (CC#58-60), Sustain (CC#61-63), Release (CC#64-66).
- Matrix Mixer Mode Option (CC#46-48).Lend a focus
- Curve Bender assign to Attack/Decay/Release (CC#46-48).
- Midi Sync Enabler (CC#46-48).
If enabled(CC#19-21) and Depth(CC#49-51) is not null then the Gate reset will be delayed by the envelope release.
- 0 ≤ VxENV ≤ 0x3f00(15bit)
= AMP * VxENVHI / 127
Envelope to Amplitude Enabler in Vx Mode Controller:
CC # | Hex | Description                                  | Range       | Reset
=====+=====+==============================================+=============+======
  19 | 13h | Voice 1/2 Mode                               |             |    0
     |     |   Bit 4: Enveloppe to Amplitude on/off       |             |
  20 | 14h | Voice 1 Mode                                 | see above   |    0
  21 | 15h | Voice 2 Mode                                 | see above   |    0
-----+-----+----------------------------------------------+-------------+------
Envelope Depth :
A negative Depth(CC#49-51) value will reverse the effect.
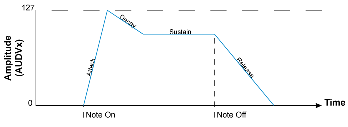
e.g. Positive Depth. AMP
- GSA Off
- Vx_DEPTH_VEL = + 63
e.g. Negative Depth.
- GSA Off
- Vx_DEPTH_VEL = - 63
Negative depth inverts the VxENV waveform.
And AMP will follow.
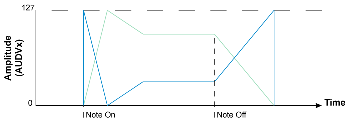
e.g. Negative Depth with GSA Enabled. AMP
- GSA On
- Vx_DEPTH_VEL = - 36
CC # | Hex | Description                                  | Range       | Reset
=====+=====+==============================================+=============+======
  49 | 31h | Voice 1/2 Envelope Depth                     |  0- 63: neg |   64
     |     | negative depth (0-63) inverts the waveform   |     64: off |
     |     |                                              | 64-127: pos |
  50 | 32h | Voice 1 Envelope Depth                       | see above   |   64
  51 | 33h | Voice 2 Envelope Depth                       | see above   |   64
-----+-----+----------------------------------------------+-------------+------
At the moment we have two 'dedicated' envelopes which behave like the other two, except that enable bits are into different registers and Vx_ENV can not modulate the other voice…
What will happen if I assign another mod via the voice modulation matrix?
From the Modulation Matrix:
- - 0x7f00(15bit) ≤ LFOx ≤ + 0x7f00(15bit)
- - 0x7f00(15bit) ≤ ENVVx ≤ + 0x7f00(15bit)
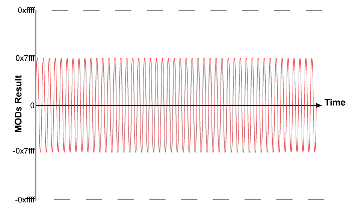
- - 0xff00(16bit) ≤ MODs ≤ + 0xff00(16bit)
MODs = LFO1_VALUE + … + LFO4_VALUE + ENV1_VALUE + ENV2_VALUE
e.g. Modulation Matrix LFO1 to Vx Amplitude is enabled.
- Vx_DEPTH_VEL = + 31 (mid pos)
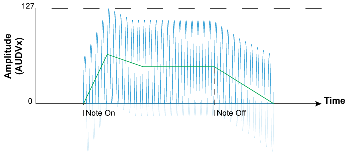
AMP = AMP * ( VxENVHI + MODsHI )
Like the extra modulations mixer, it results in the addition of the dedicated envelope value and the Matrix Modulation result.
And it's not really what I wanted. As you can see, the MODS result alters the envelope.
At the end of the release, amplitude is not zero, which causes audio clicks.
My issue was to add two others Mixing modes…
Envelope Matrix Mixer Mode options:
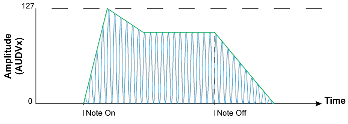
So we've got the basic
A + B Mixer Mode.
AMP = AMP * ( VxENVHI + MODsHI )
- Vx_DEPTH_VEL = + 31 (mid pos)
Here the
A * B Mixer Mode.
AMP = AMP * ( VxENVHI * MODsHI )
- Vx_DEPTH_VEL = + 63
Here the
A + A * B Mixer Mode.
AMP = AMP * ( VxENVHI + VxENVHI * MODsHI )
- Vx_DEPTH_VEL = + 63
CC # | Hex | Description                                  | Range       | Reset
=====+=====+==============================================+=============+======
  46 | 2Eh | Voice 1/2 Envelope Options                   |             |    0
     |     |   Bit 0-1: Envelope Mixing Mode              |             |
     |     |       0= Env + Modulation Matrix             |             |
     |     |       1= Env * Modulation Matrix             |             |
     |     |       2= Env + (Env * Modulation Matrix)     |             |
  47 | 2Fh | Voice 1 Envelope Options                     | see above   |    0
  48 | 30h | Voice 2 Envelope Options                     | see above   |    0
-----+-----+----------------------------------------------+-------------+------
Envelope Curve and options :
CC # | Hex | Description                                  | Range       | Reset
=====+=====+==============================================+=============+======
  52 | 34h | Voice 1/2 Envelope Curve                     |   0-63: neg |   64
     |     | Note: Curve must be enabled separately       |      0: lin |
     |     | for Attack/Decay/Release parameter w/ CC#46  | 64-127: pos |
  53 | 35h | Voice 1 Envelope Curve                       | see above   |   64
  54 | 36h | Voice 2 Envelope Curve                       | see above   |   64
-----+-----+----------------------------------------------+-------------+------
  46 | 2Eh | Voice 1/2 Envelope Options                   |             |    0
     |     |   Bit 4: Use curve parameter to Attack       |             |
     |     |   Bit 5: Use curve parameter to Decay        |             |
     |     |   Bit 6: Use curve parameter to Release      |             |
  47 | 2Fh | Voice 1 Envelope Options                     | see above   |    0
  48 | 30h | Voice 2 Envelope Options                     | see above   |    0
-----+-----+----------------------------------------------+-------------+------
Envelope parameters :
CC # | Hex | Description                                  | Range       | Reset
=====+=====+==============================================+=============+======
  55 | 37h | Voice 1/2 Envelope Attack                    |  0-127: val |    0
  56 | 38h | Voice 1 Envelope Attack                      | see above   |    0
  57 | 39h | Voice 2 Envelope Attack                      | see above   |    0
-----+-----+----------------------------------------------+-------------+------
  58 | 3Ah | Voice 1/2 Envelope Decay                     |  0-127: val |    0
  59 | 3Bh | Voice 1 Envelope Decay                       | see above   |    0
  60 | 3Ch | Voice 2 Envelope Decay                       | see above   |    0
-----+-----+----------------------------------------------+-------------+------
  61 | 3Dh | Voice 1/2 Envelope Sustain                   |  0-127: val |    0
  62 | 3Eh | Voice 1 Envelope Sustain                     | see above   |    0
  63 | 3Fh | Voice 2 Envelope Sustain                     | see above   |    0
-----+-----+----------------------------------------------+-------------+------
  64 | 40h | Voice 1/2 Envelope Release                   |  0-127: val |    0
  65 | 41h | Voice 1 Envelope Release                     | see above   |    0
  66 | 42h | Voice 2 Envelope Release                     | see above   |    0
-----+-----+----------------------------------------------+-------------+------
Envelope Sync option :
CC # | Hex | Description                                  | Range       | Reset
=====+=====+==============================================+=============+======
  46 | 2Eh | Voice 1/2 Envelope Options                   |             |    0
     |     |   Bit 3: Envelope Midi Sync on/off           |             |
  47 | 2Fh | Voice 1 Envelope Options                     | see above   |    0
  48 | 30h | Voice 2 Envelope Options                     | see above   |    0
-----+-----+----------------------------------------------+-------------+------
Pitch Specifics
TIA pitch scale is poor (AUDFx, 32 values maximum).
I thought this box as an FX synth, so in addition to others sound modules. No matter that it monopolizes an entire keyboard channel in normal mode.
My first idea was tu use the Splitter key which already exists, but they are not accessible via CC and not adapted to the TIA scale.
So I add some specifics parameters for TIA Frequency (pitch) in tia_sw.inc.
Despite the size of AUDFx and the lack of frequency accuracy, the 16bit frequency registers were kept. I wanted this process valuable for other project, e.g. POKEY.
TIA_SW_Note, TIA_SW_Pitch and TIA_SW_Porta functions handle AUDFx registers, calculates Frequency from Parameters:
- Note(and Arpeggiator).
- Key Extended option.
- Transpose.
- Pitch Bend and Pitch Range.
- Portamento.
- Dedicated Envelope (to Pitch).
- Modulation Matrix (to Pitch).
Copy_Freq, Engine Value to TIA register (done after all other pitch process) :
- 0 ≤ AUDFx < 25
- 0 ≤ FREQ < 216
AUDFx = ( 255 - FREQHI ) » 3
Remember… AUDFx Value must be inverted.
Pitch:Key Extended Option
This feature is a bit enabler located in the Voice Mode Controller(CC#19-21).
In normal mode, it splits a keyboard in 2 ranges of Keys Length(CC#40-42), which start at their respective Note Offsets(CC#37-39), there's one range per Voice.
In Extended mode, the 32 notes scale of the TIA is expanded to the keyboard midi range (128 notes). So 4 Keys per value.
Voices can share same MIDI Channel.
Key extended Enabler in Vx Mode Controller:
CC # | Hex | Description                                  | Range       | Reset
=====+=====+==============================================+=============+======
  19 | 13h | Voice 1/2 Mode                               |             |    0
     |     |   Bit 2: Keyboard Extended on/off            |             |
  20 | 14h | Voice 1 Mode                                 | see above   |    0
  21 | 15h | Voice 2 Mode                                 | see above   |    0
-----+-----+----------------------------------------------+-------------+------
Key extended is off (normal mode).
- 1 ≤ Vx_KEY_OFFSET ≤ 127 (0=off)
- 0 ≤ Vx_KEY_LENGTH ≤ 31
- 1 ≤ Vx_NOTE ≤ 127
If Vx_NOTE ≥ Vx_KEY_OFFSET AND Vx_NOTE ≤ ( Vx_KEY_OFFSET + Vx_KEY_LENGTH ) then
FREQHI = ( Vx_NOTE - Vx_KEY_OFFSET ) « 3
FREQLO = 0
CC # | Hex | Description                                  | Range       | Reset
=====+=====+==============================================+=============+======
  37 | 25h | Voice 1/2 Key Offset                         | 0-127: val  |   24
  38 | 26h | Voice 1 Single Key Offset                    |             |   24
  39 | 27h | Voice 2 Single Key Offset                    |             |   60
     |     | Note: Inactive if Key Extended On            |             |
-----+-----+----------------------------------------------+-------------+------
  40 | 28h | Voice 1/2 Key Length                         | 0-31: val   |   31
  41 | 29h | Voice 1 Single Key Offset                    |             |   31
  42 | 2Ah | Voice 2 Single Key Offset                    |             |   31
     |     | Note: Inactive if Key Extended On            |             |
-----+-----+----------------------------------------------+-------------+------
- e.g. Default configuration.
- V1_Offset=24, Length=32.
- V2_Offset=60, Length=32.
- Voice 1 starts at offset 24(C0) and reacts to the range(C0 to G2).
- Voice 2 starts at offset 60(C3) and reacts to the range(C3 to G5).
- One key for each AUDFx Values.
- e.g. Voices can share same zone region or entire zone.
- V1_Offset=24, Length=32.
- V2_Offset=36, Length=20.
- Voice 1 starts at offset 24(C0) and reacts to the range(C0 to G2).
- Voice 2 starts at offset 36(C1) and reacts to the range(C1 to G2).
- Both sounds will be played on the shared region C1 to G2, only one in non-crossing region.
Key extended is on.
- 1 ≤ Vx_NOTE ≤ 127
FREQHI = Vx_NOTE « 1
FREQLO = 0
- e.g. V1 & V2 in KeyExtended mode.
- Voice 1 starts at offset 1(C#-2) and reacts to the range(CC#-2 to G8), 4 keys resolution.
- Voice 2 starts at offset 1(C#-2) and reacts to the range(CC#-2 to G8), 4 keys resolution.
- Four keys for each AUDFx Values.
- e.g. Only V1 in KeyExtended mode.
- V2_Offset=60, Length=32.
- Voice 1 starts at offset 1(C#-2) and reacts to the range(CC#-2 to G8).
- Four keys for each AUDF0 Values.
- Voice 2 starts at offset 60(C3) and reacts to the range(C3 to G5).
- One key for each AUDF1 Values.
Pitch:Vx Envelope
Downloads
Check it out from my playground on the svn!
Firmware:
Tools:
- MIDIbox TIA BankStick Check and Debug Tool
Documentation:
The MIDIbox TIA Manager
ASAP
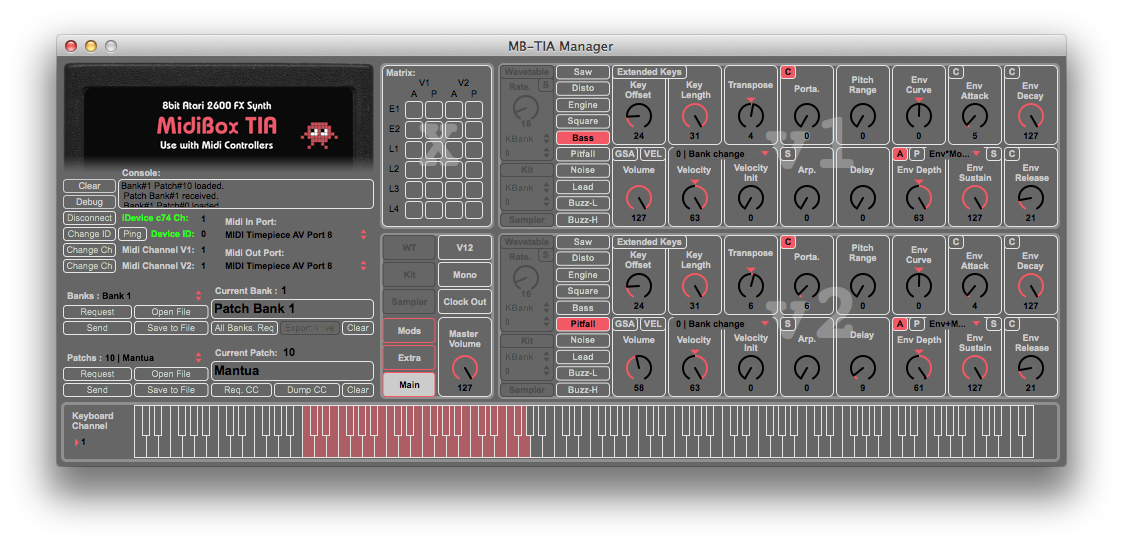
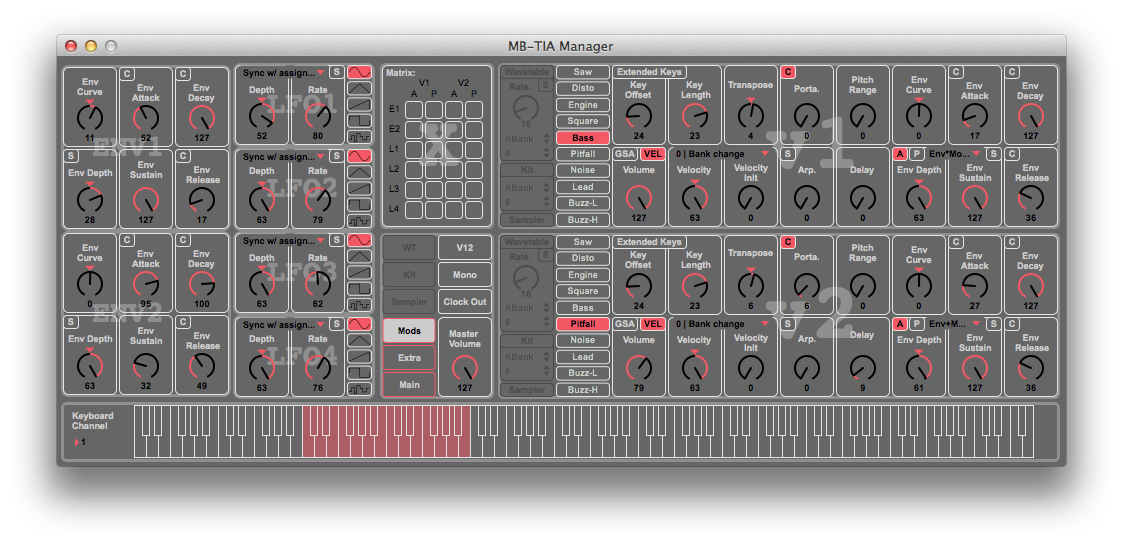 * Max Manager
The MIDIbox TIA Cartridge Version
Building it!
You will need:
- A TIA chip.
- A game Cartrige with sticker and internal EPROM removed.
- The last version of the PCB.
- The last version of the aluminum backplane.
- Some components, wire and connectors.
- The last firmware.
The TIA chip
Find a TIA chip is already explain in "Where do i find this chip?" chapter above on this page
Which game cartridge?
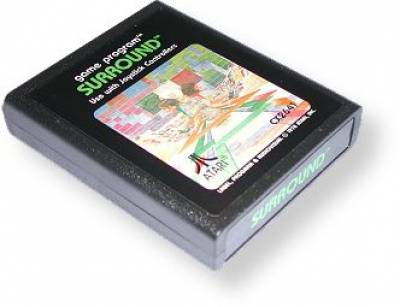
Any standard ATARI brand game like this one.
You will find a full list of the compatible games in the 'ATARI' section on AtariAge
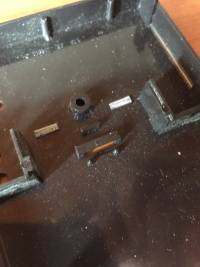
- Remove the stickers and you will find a screw.
- Open the box and remove averything inside, just keep the 2 plastic parts of the box and the screw.
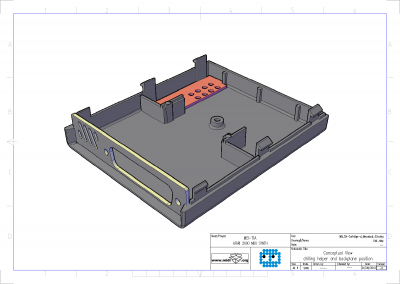
- Cut the two plastic clamps inside the top cover by bending it.
Note: How to drill the led holes is explained in the next 'backplane' chapter.
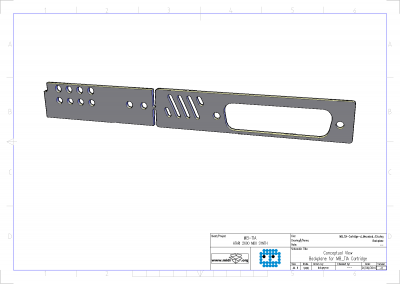
The aluminum backplane
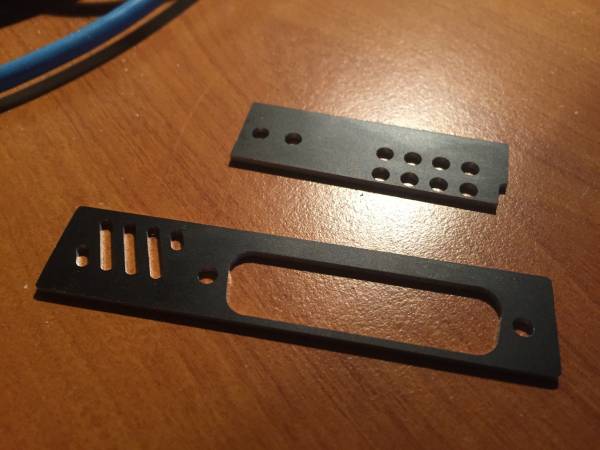
It's a 1.5mm thick aluminum plate.
There's two part which have to be separated
Right part is the backplane for the synth connector(a DB25 F).
Left is to help you drilling the led holes, just place it inside the top cover and use a 3mm drill bit:
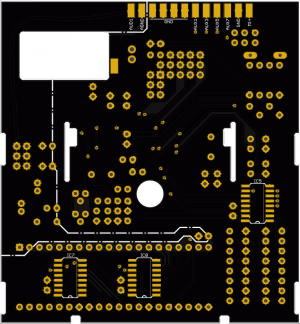
PCB
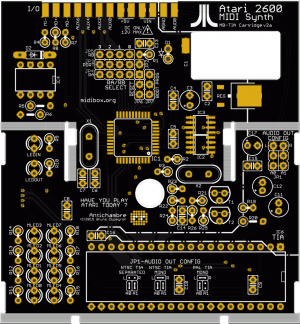
This is version 2, there's some improvements since version 1.
- I solved a crossover issue.
- I removed the power switch which is hard to find.
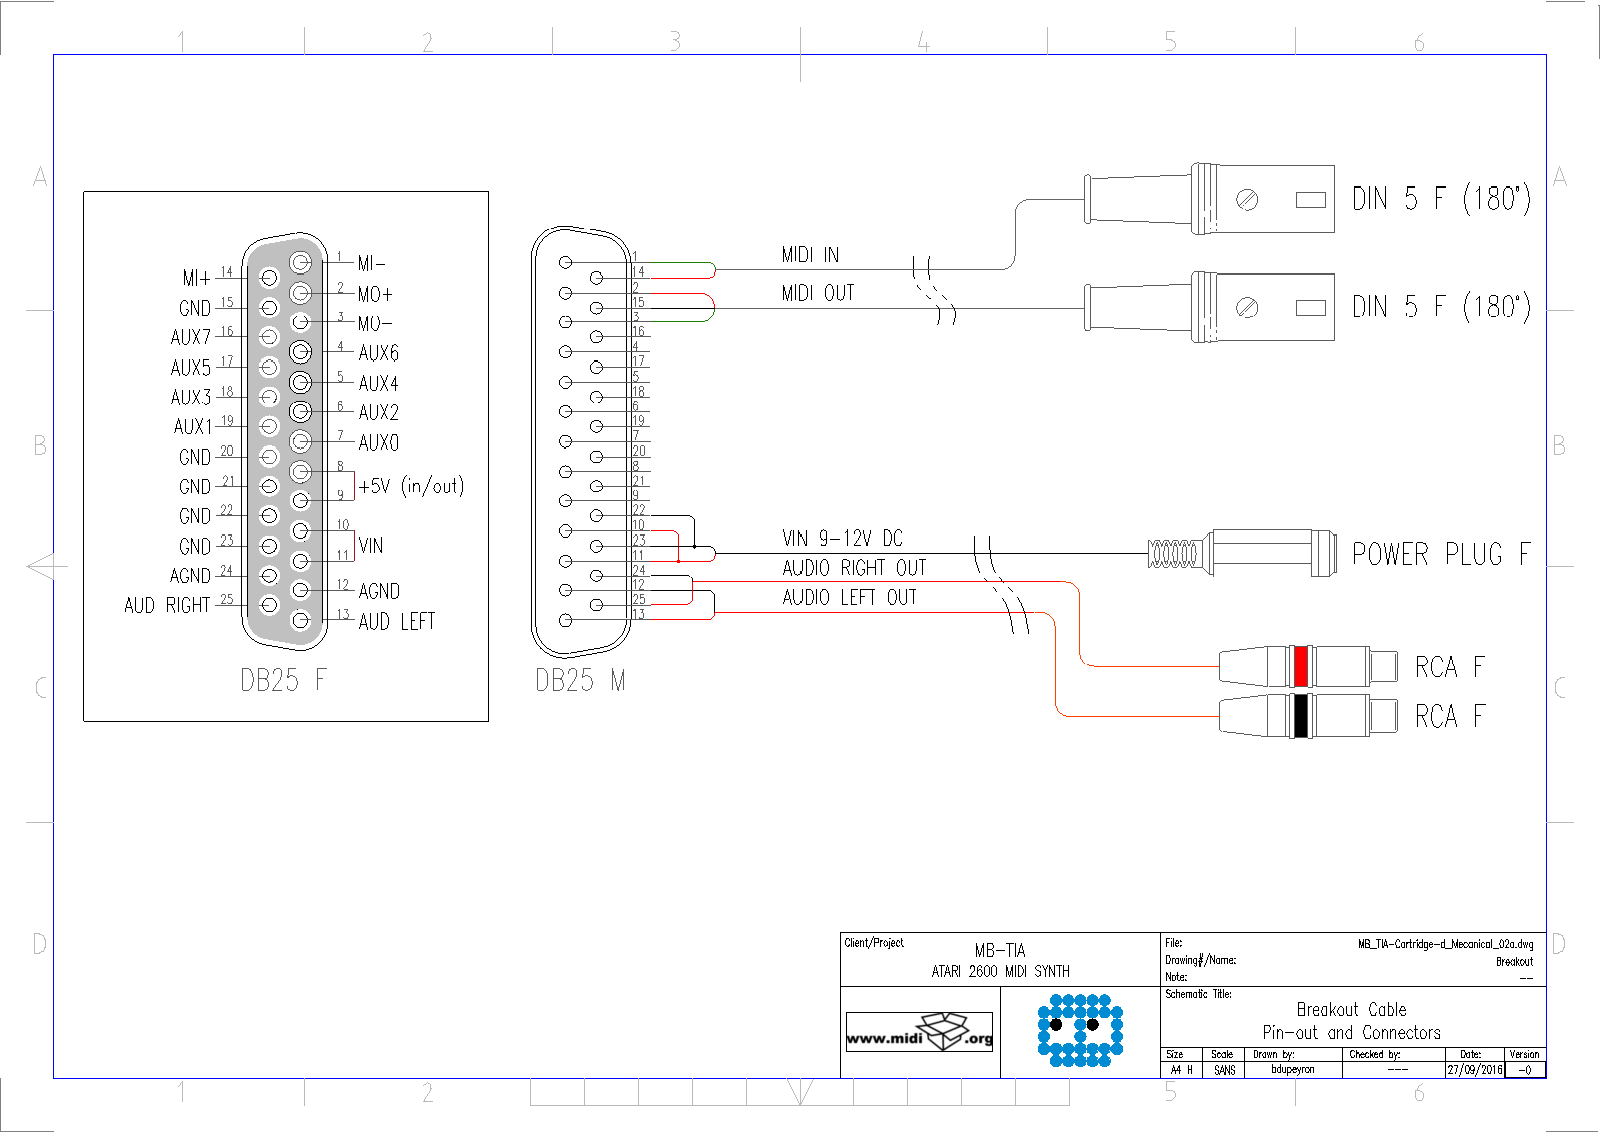
- MIDI / AUDIO / POWER and EXPANSION share now the same connector, everything is on a DB25 Female.
- I changed some DIP package to SMD, don't worry it remains easy to solder.
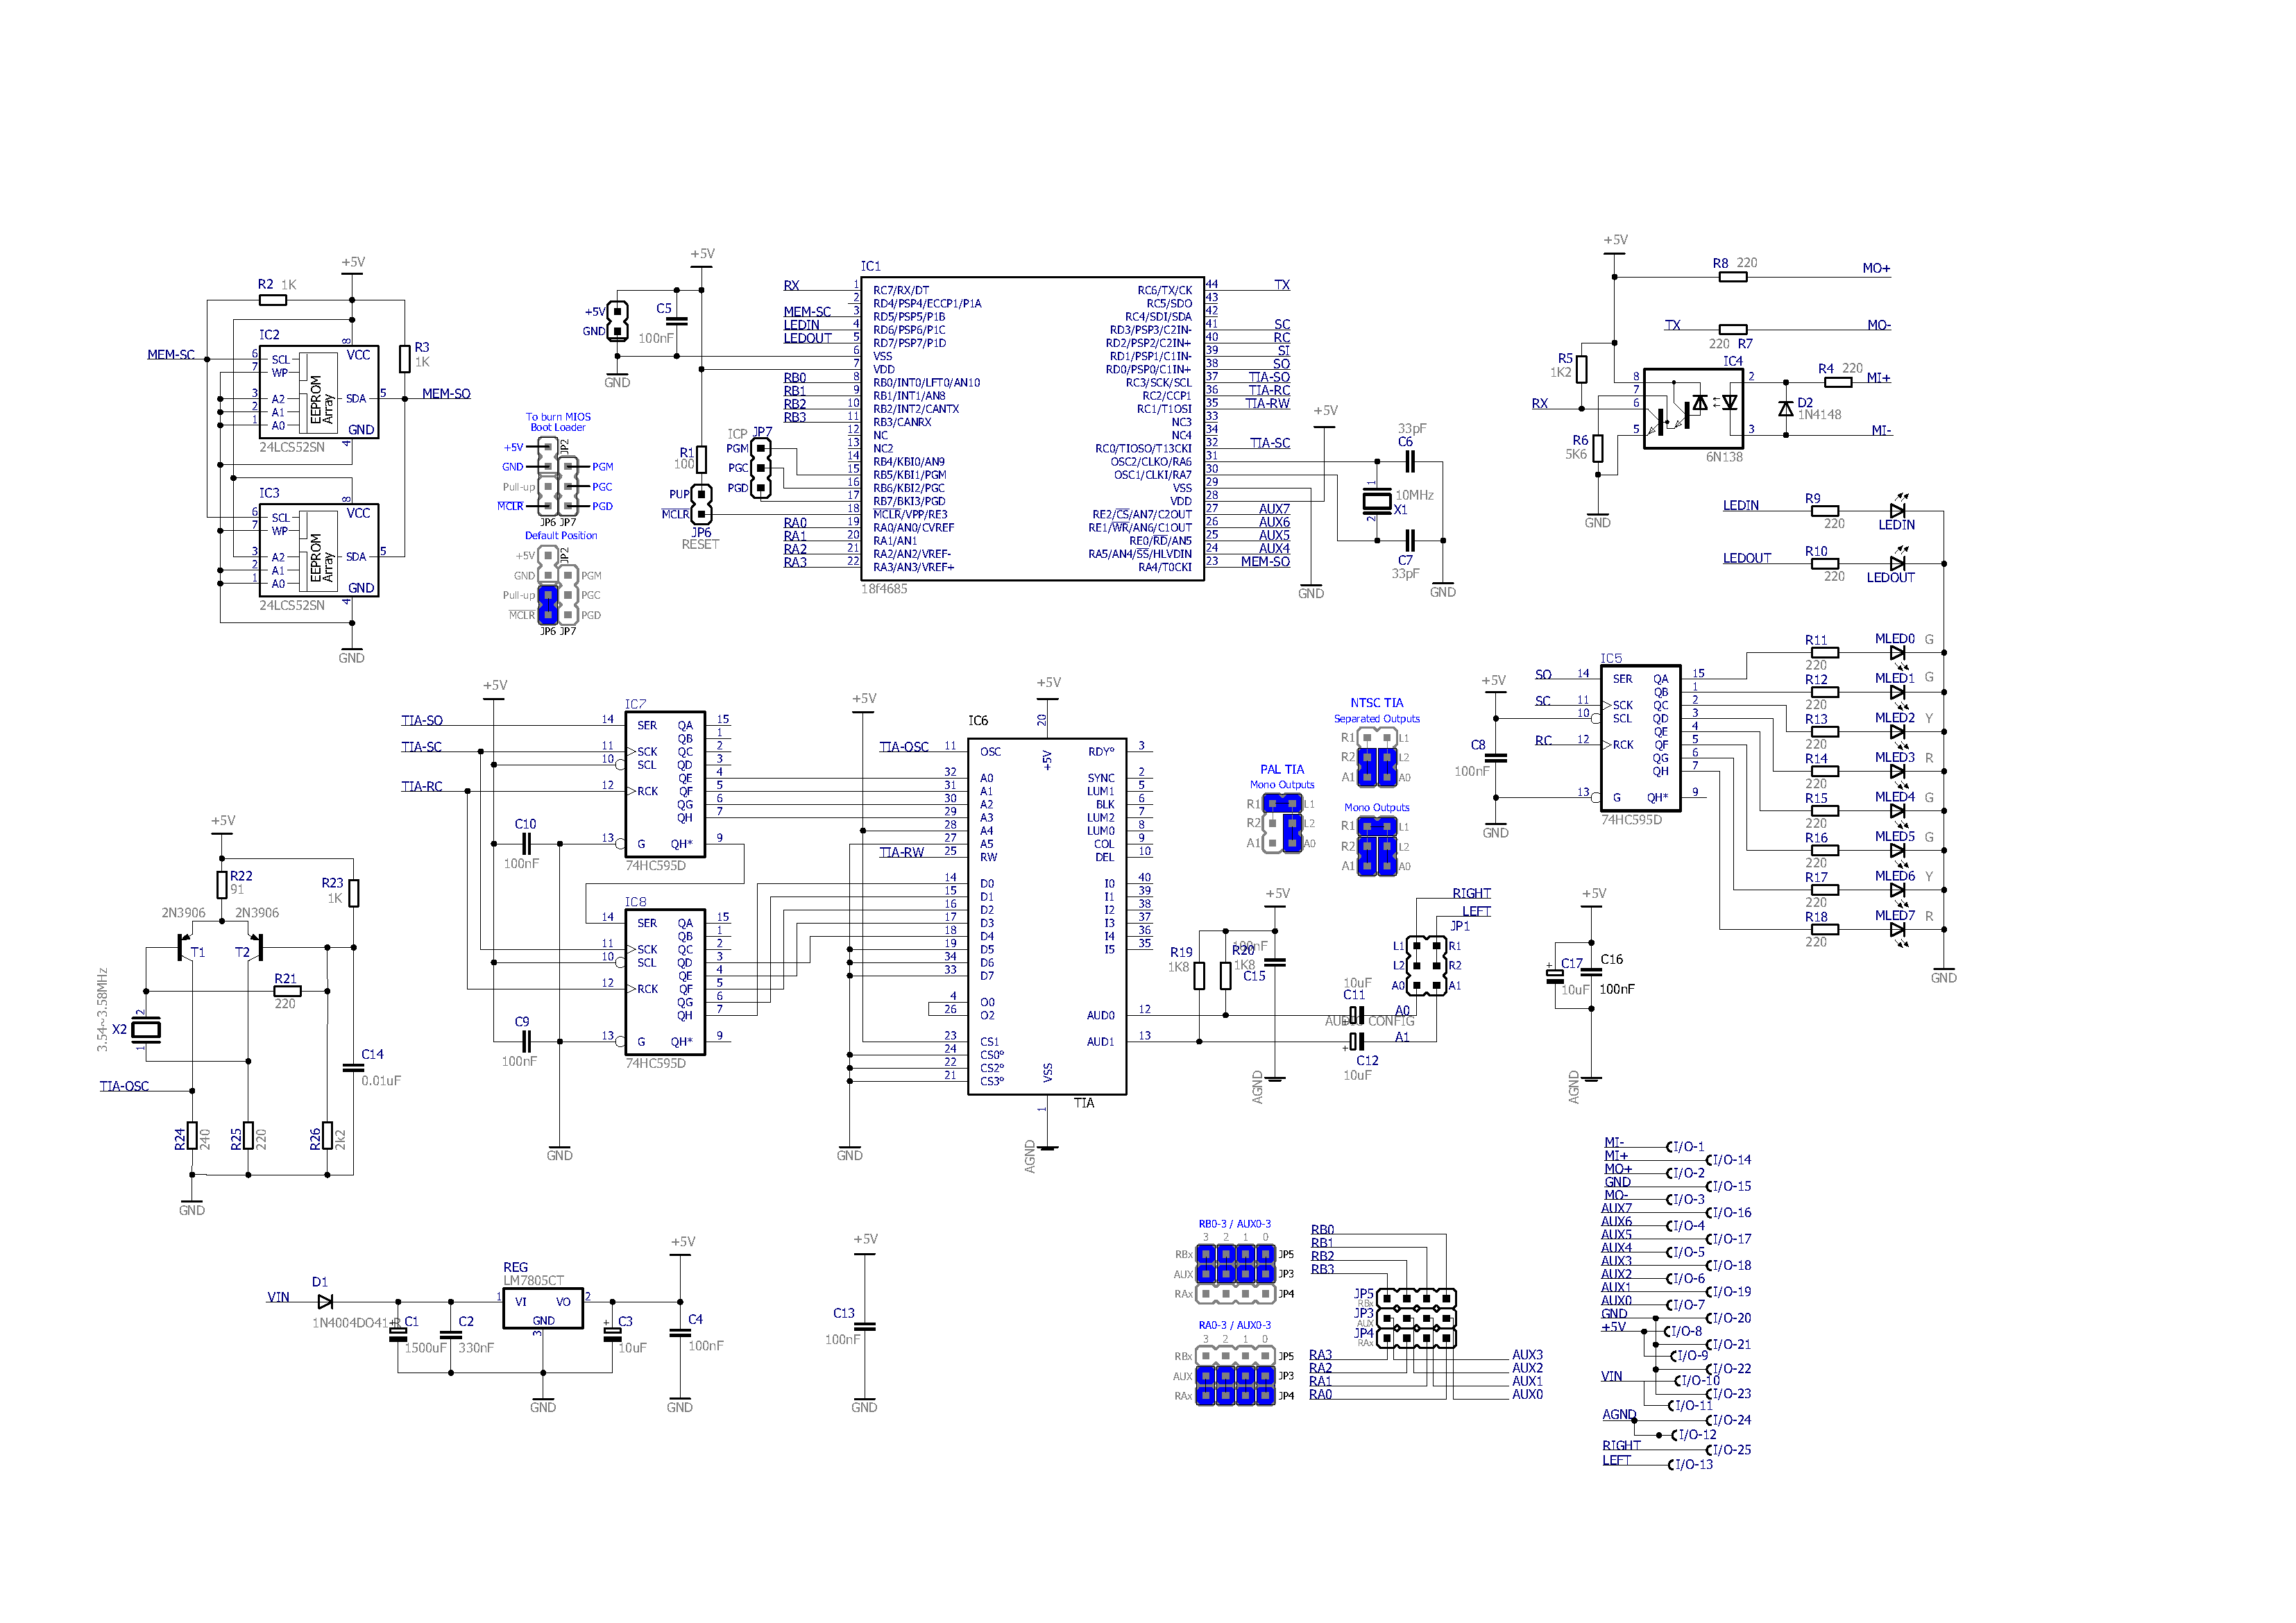
Schematic
Layout
Note: Because of the PIC package… If you haven't got any PIC Burner, I can solder the IC and burn the bootloader for you, just tell me.
Cartridge Parts & BOM
Mouser BOM, corrected by yogi, (2016/12/21)
IC Socket for IC4 IC6 added, (2017/05/05)
| Part | Value | Type | Qty |
|---|---|---|---|
| C1 | 1500uF | Polarized Capacitor | 1 |
| C2 | 330nF | Multilayer Ceramic Capacitors | 1 |
| C3,C17 | 10uF | Polarized Capacitor | 2 |
| C4,C5,C8,C9,C10,C13,C15,C16 | 100nF | Multilayer Ceramic Capacitors | 8 |
| C6,C7 | 33pF | Multilayer Ceramic Capacitors | 2 |
| C11,C12 | 10uF | Polarized Capacitor (Audio Grade) | 2 |
| C14 | 10nF | Multilayer Ceramic Capacitors | 1 |
| D1 | 1N4004 | Diode | 1 |
| D2 | 1N4148 | Diode | 1 |
| I/O | SUB-D25 F Solder cup | 1 | |
| IC1 | 18f4685 | 1 | |
| IC2,IC3 | 24LC512 | Serial EEPROM | 2 |
| IC4 | 6N138 | High Speed Optocoupler | 1 |
| IC5,IC7,IC8 | 74HC595D | 8-bit Shift Register, output latch | 3 |
| JP1,JP2,JP3,JP4,JP5,JP6,JP7 | – | header pin strip 40p | 1 |
| LEDIN,LEDOUT,MLED3,MLED7 | Red | Led 3mm | 4 |
| MLED0,MLED1,MLED4,MLED5 | Green | Led 3mm | 4 |
| MLED2,MLED6 | Yellow | Led 3mm | 2 |
| R1 | 100 | Resistor | 1 |
| R2,R3,R23 | 1K | Resistor | 3 |
| R4,R7,R8,R9,R10,R11,R12,R13,R14,R15,R16,R17,R18,R21,R25 | 220 | Resistor | 15 |
| R5 | 1K2 | Resistor | 1 |
| R6 | 5K6 | Resistor | 1 |
| R19 | 1K8 | Resistor | 1 |
| R20 | 1K8 | Resistor | 1 |
| R22 | 91 | Resistor | 1 |
| R24 | 240 | Resistor | 1 |
| R26 | 2k2 | Resistor | 1 |
| REG | 7805DT | Positive Voltage Regulator | 1 |
| T1,T2 | 2N3906 | PNP Transistor | 2 |
| X1 | 10MHz | Crystal | 1 |
| X2 | 3.54~3.58MHz | Crystal | 1 |
| IC Socket for IC4 | DIP8 | IC Support | 1 |
| IC Socket for IC6 TIA | DIP40 | IC Support | 1 |
Breakout Cable
| Connector | Qty | Example |
|---|---|---|
| D-Sub 25 Male | 1 | Amphenol L717SDB25PVF @Mouser |
| Cover for D-Sub 25 | 1 | – |
| Female Screwlock, washer and Nut | 2 | – |
| DIN 5pin Female | 2 | Switchcraft Inc. 06AL5FX @Digikey |
| RCA F Red | 1 | Amphenol Audio ACJR-RED @Mouser |
| RCA F Black/White | 1 | Amphenol Audio ACJR-BLK @Mouser |
| DC Power Plug F | 1 | CUI PR-002A @Mouser |
And Some Wire.
Firmware
Refer to the download section on this page.
Base and Cartridge versions firmware are the same, only the asm setup differs.
Here the Hex file for cartridge version app.(Led Meter issue fixed!)
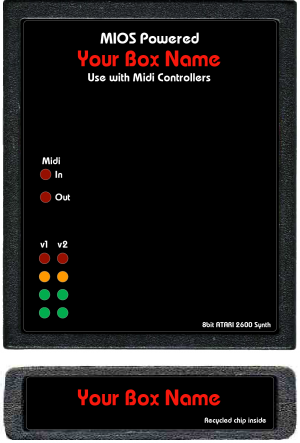
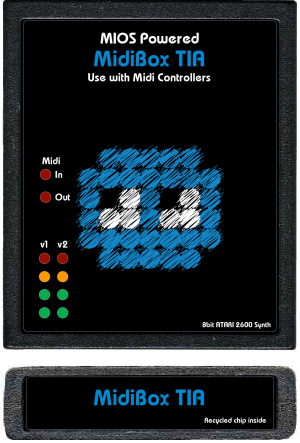
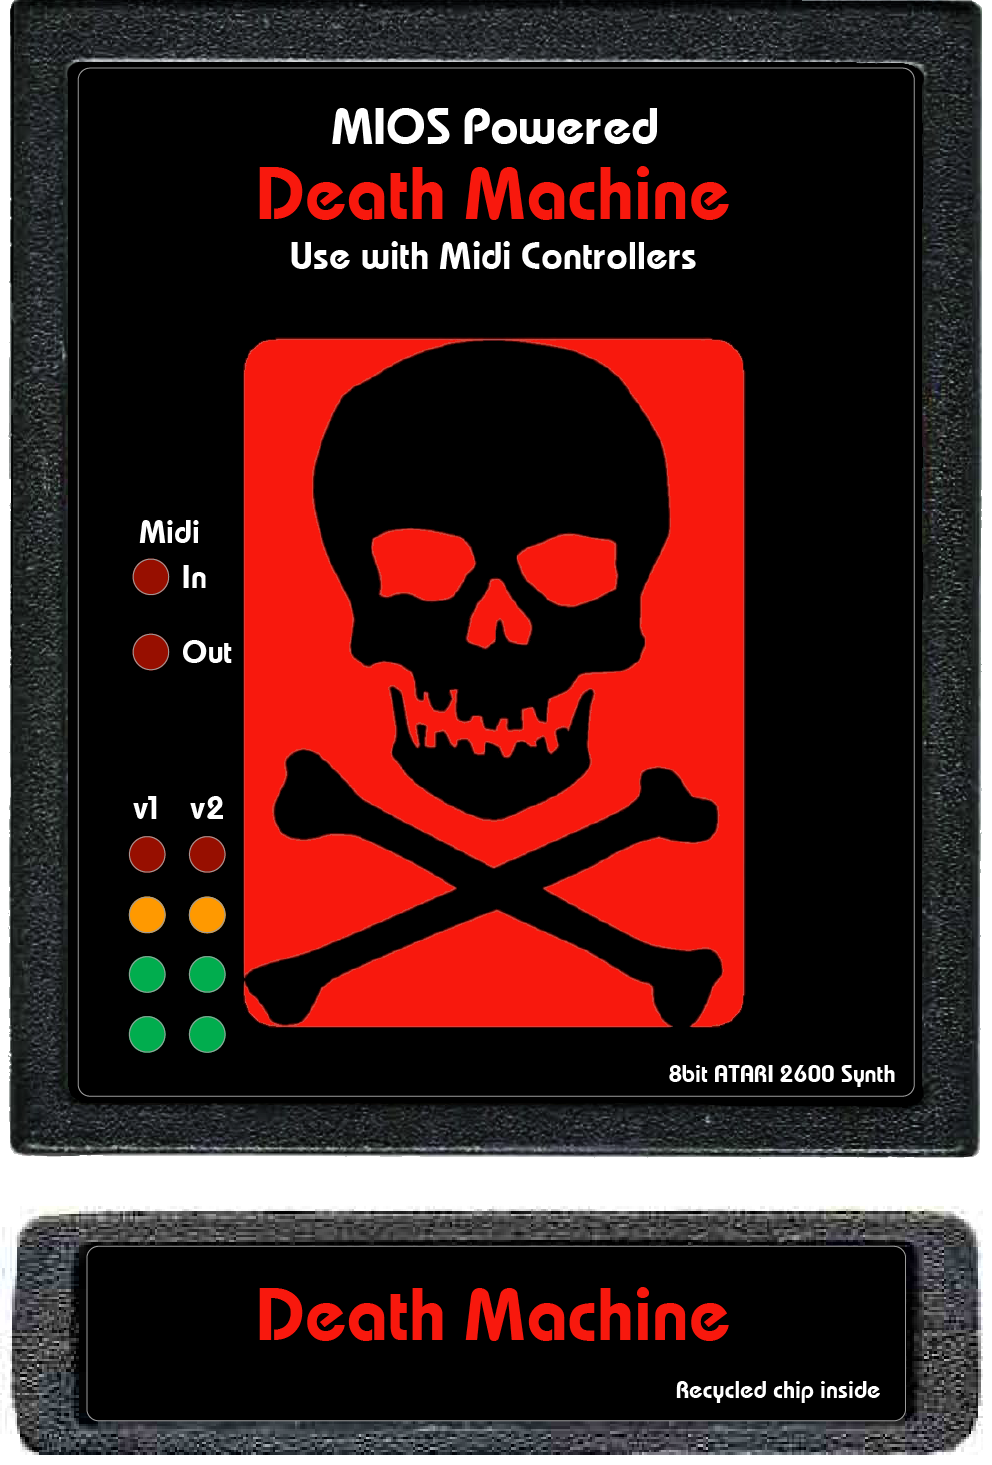
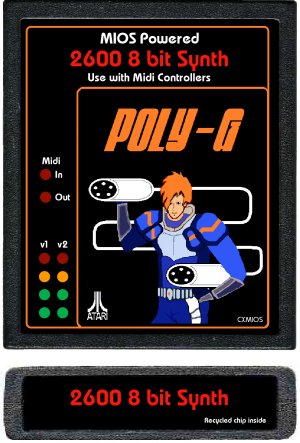
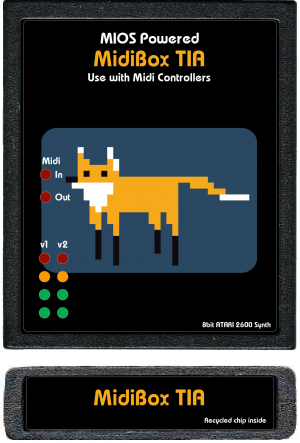
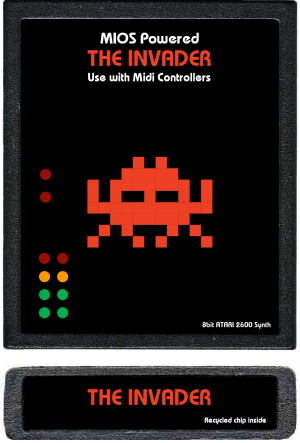
Customized Labels
I've prepared an illustrator template file, inside you will find two model examples.
Just add your own bitmap or vecto, change the legend. And LABEL will be ready for printing.
There's cutout layer too, for printer with cutter head.
Somes examples:
Find the kit
For any questions, informations or observations do not hesitate to contact me (Forum).
Antichambre.
You can also follow the thread on forum.

