Table of Contents
SVN Client Setup for Windows
MIOS Sources are now stored on an SVN server which uses SSH for secure transfers if you need write access. This has many advantages for us, but we may first need to setup a couple of tools.
This document will provide a few different options, so don't worry if it looks big and confusing, just follow the steps, you can skip the parts you don't need, and you'll be ready in no time :)
There are a few ways to access the MIOS SVN code repository:
- Web (read-only): This allows you to view individual files via web browser. If you're reading this, then you already have a browser installed. All you need to do, is click here.
This method will not save the files to your PC's hard disc unless you do it from your browser, and will not allow you to upload new/edited code to the server. It's just an easy way to look at the existing code.
- SVN Client (read-only): This allows you to view the desired parts of the repository in an SVN repository browser, or 'checkout' the parts of the repository you need and save them to your hard disc.
This method will not allow you to upload new/edited code to the server.
- SVN Client with SSH2 (read/write): This allows you to view the desired parts of the repository in an SVN repository browser, or 'checkout' the parts of the repository you need and save them to your hard disc, etc.
This method will also allow you to upload new/edited code to the server. If you use this method, you can also install an additional tool to assist with the login process (it will prevent you from having to type in your password lots of times).
If you decide now which method will be best suited to your requirements, then this document will be a little easier to follow (actually you can just click the relevant link above). If you change your mind later, you can always install and configure the other applications, so don't worry if you get it wrong first time ;)
If you only need web access, you can stop reading now, and click the link to http://svnmios.midibox.org. Easy!
PuTTY
PuTTY
PuTTY is a TTY/SSH client for Windows and *nix. This toolkit allows us to use SSH encryption, which is required for write access to the repository. If you want to use the TortoiseSVN client for read-only access, you don't need this software, so click here to skip this section.
Install PuTTY
You can download the installer from the download page. There are nightly builds available from that page and you can download the individual programs that make up the whole toolkit, but if you don't need those (or aren't sure) I would recommend that you download the current stable version of the installer for the whole package putty-0.60-installer by clicking this link
Installation is very simple, just run the .exe, and click 'Install','Next', 'Next', 'Finish'.
SSH Keypair Generation
This step is only required if you need to write to the MIOS/Application code. If you don't change any code, then you can click here to skip this section. If you want write access, it makes sense to do this step first.
MIOS SVN access uses SSH-2 for security. SSH uses a pair of keys (a 'keypair'); one private, and one public. Your private key stays with you, and your public key is sent to the SVN server. This allows the SVN server to ensure that you are really who you say you are.
One of the applications in the PuTTY package is PuTTYGen. This tool gives us a simple method of creating the keypair. Run the program - you should see the icon in your Start Menu after using the above installer.
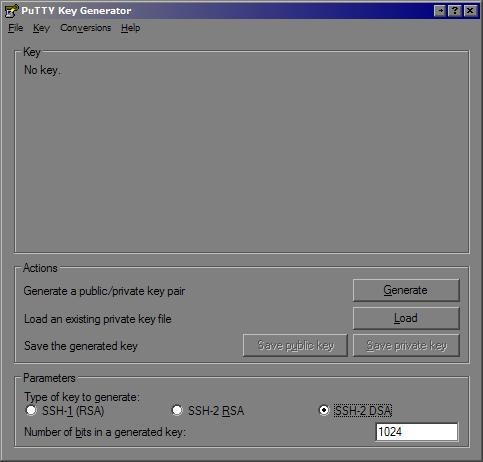
Change the key type to SSH-2 DSA, and click 'Generate':
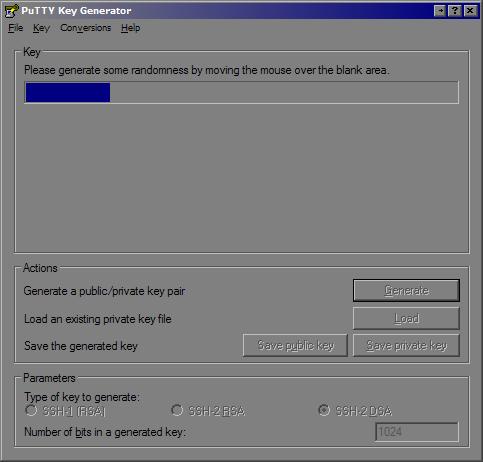
Wiggle your mouse around in the big grey space, to create random input for the program:
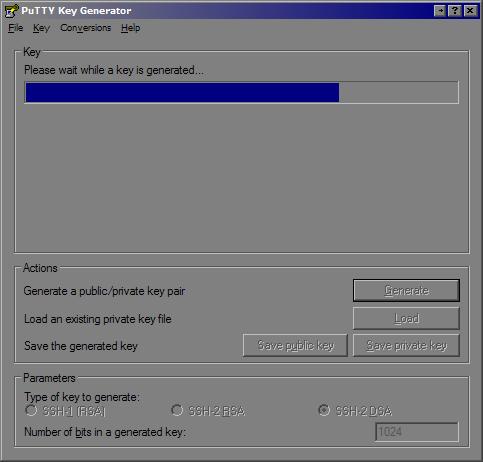
Once the key has been generated, you can add a passphrase. This is used to protect your private key, which is kept on your local PC, from being used without your passphrase. Don't forget this! If you have a bad memory, I recommend you use a tool like KeePass to remember it (you can also save a copy of the keypair in KeePass as a backup)
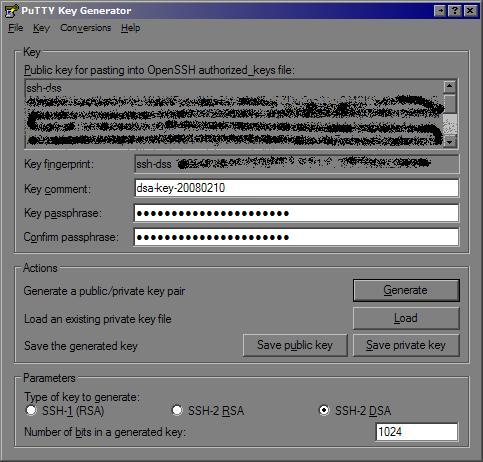
Now, click 'Save Private Key'. This will create a file with a .ppk extension. Save it someplace handy, you'll need this later. Next, click 'Save Public Key'. This will create a file with whatever extension you specify, you could name it as *.pub. Save it with your private key.
There is a section of the forum with restricted access for programmers who may need to upload. If you need this access, PM TK, he may add you into this group. Once there, you will find a sticky thread where you can attach your public key (NOT the private one. That's private, man! ;) ) to a post. Once your public key has been added to the MIOS SVN server by an admin, then you will be able to authenticate to write to the repository. Let's move onto the next step.
PuTTY Session Setup
This step is required if you need to write to the MIOS/Application code. If you don't change any code, then you can click here to skip this section. Here's how to set up PuTTY:
Run PuTTY. There should be an icon in your start menu.
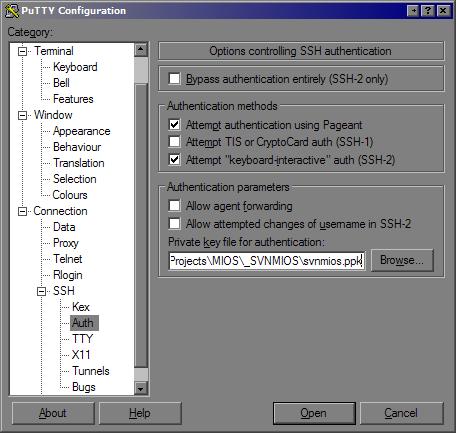
In the tree-view on the left, drill down to 'Connection… SSH… Auth'. In the box labelled 'Authentication parameters', click the button and browse to your .ppk file (the private Key, not the public one) you saved earlier. Hit 'Open'. You should see a screen like this:
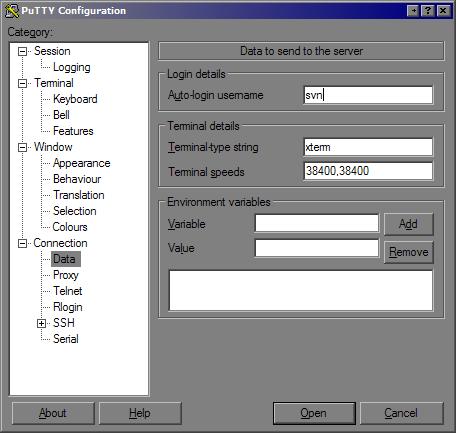
Now use the tree-view to drill to 'Data'. In the box labelled 'Login details', is a text field labelled 'Autio-login Username'. Type “svn” (without the quotes) into this box:
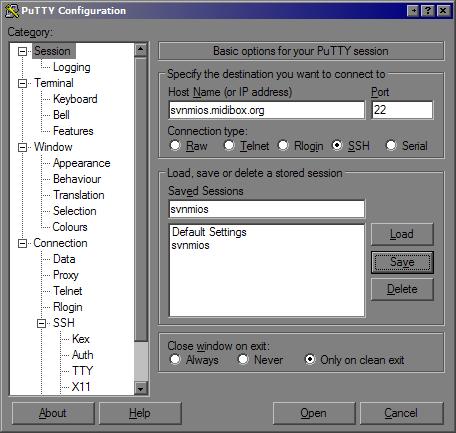
Now drill to 'Session' in the tree-view. This should be the same screen you saw when you first ran PuTTY. In the text box at the top labelled 'Host Name (or IP address)', type “svnmios.midibox.org” (without the quotes). The Port stays at 22 - Note: You might have to allow this port in your firewall! In the text box labelled 'Save sessions', type in a session name such as “svnmios”, and Click 'Save'. You should see your session name added to the list. Remember this name for later.
Testing the PuTTY Session
This step is not required, but is a good way to check that your session is setup correctly and that your SSH keypair is functioning correctly. After you save the session above, just click the button at the bottom labelled 'Open'.
You will see a terminal window open, if this is the first time you connect (which it probably will be) then you should be prompted with the following message:
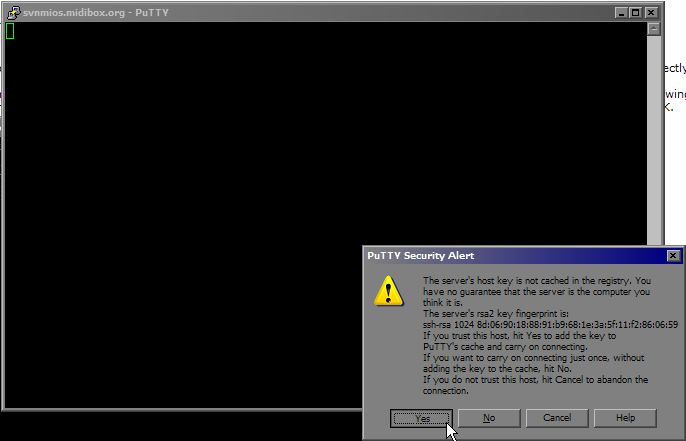
Click Yes if the SSH fingerprint in your message matches the one in this picture (means that it's really midibox.org you're talking to) and you should not see this message again.
Next you will be prompted for your private key's passphrase. Type it in, and you will see the following screen. Note the error, “Server refused to allocate PTY” is a cosmetic error, and is totally normal. Other errors probably mean you did something wrong ;) Close the screen when you've confirmed that all is working OK.
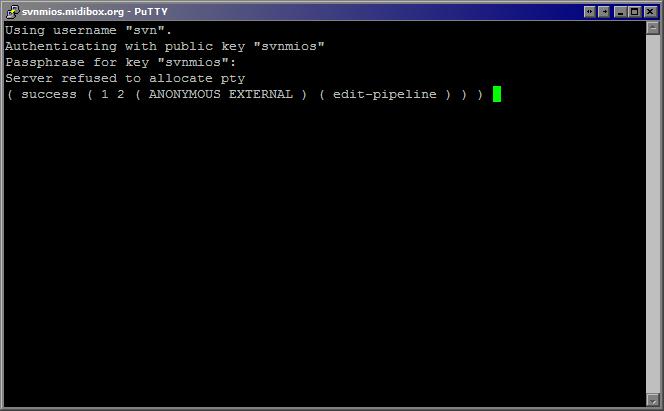
Note that if you are prompted for a password, then your SSH keypair has failed. If you're sure that TK has added your public key, then your session config may need checking.
Pageant Setup
This step is not required, but it can make life a bit easier if you are using SSH authentication for write access.Click here to skip this section. If you tried the PuTTY session test above, you will have noticed that you are prompted for your private key's passphrase. This happens several times during the normal login process, and personally I am way too lazy for that ;) If you're lazy too (or maybe have arthritis/tendonitis/RSI/etc like me), you can use one of the PuTTY tools, called Pageant, to store the private key and it's passphrase.
The shortcut for Pageant should be in your start menu. Run it, and an icon (which looks like a computer monitor with a black hat on) will be added to the System Tray (that's the thing in the bottom right corner of your screen with the clock in it). It looks like this:

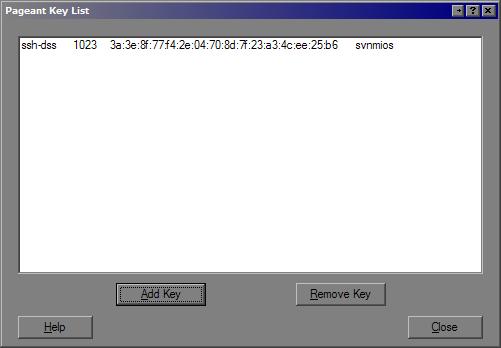
Double click the icon, and you will see a mostly empty window. Click the button labelled 'Add Key', and browse to your private key (*.ppk). When you click 'Open', you will be prompted for your passphrase.
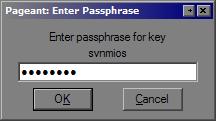
Type it in, click 'OK', and you should now see the Pageant window has your private key added:
Testing Pageant
This step is not required, but is a way to test that Pageant, your PuTTY session, and your SSH authentication, are all functioning correctly.Click here to skip this section
Right-click the Pageant icon in the System Tray. A context menu will pop up, and you will see a menu item 'Saved Sessions', and below that, you will see your previously saved session. Click it, and a terminal session will open up and log you in, just as in the above PuTTY Session test, but without any intervention. Smooth.
Auto-loading Pageant
If you would like pageant to take care of the logins for you all the time, you should set it up to automatically load your key every time you boot. First, find the shortcut in your start menu. Copy this shortcut into the 'startup' folder, so that it will run every time you start your PC.
Now, right-click on the shortcut, and select 'Properties'. In the box labelled 'Target', you will see this: “C:\Program Files\PuTTY\pageant.exe”.
Add to the end of this field, the path to your ppk file, enclosed in quotes; so the 'Target' field will now read like: “C:\Program Files\PuTTY\pageant.exe” “C:\somedir\svnmios.ppk”.
Click 'OK' and you're done!
Let's get Tortoise going, shall we? :)
TortoiseSVN
TortoiseSVN
TortoiseSVN is a Windows Explorer (aka 'My Computer') shell extension. This allows you to integrate the MIOS SVN repository with your local PC file system, and to use a dedicated SVN repository browser. This tool is required for all methods except web-based access.
Install Tortoise
You can download the installer from the download page. There are 64-bit installers, release candidates and nightly builds available from that page, but if you don't need those (or aren't sure) I would recommend that you download the current stable version |TortoiseSVN-1.4.8 by clicking this link.
Installation is very simple, just run the .msi, and click ‘Next’, Accept the license, Click ’Next’, ‘Next’, and 'Install'. When it's done, Click Finish. Reboot your PC if you are prompted. Don't be lazy. I would never do that. ;D
Using Tortoise
Using Tortoise is a subject which I will not cover in-depth here, as the Tortoise manual and Website do a good job of that. The thing to remember, is that this is not a standalone application, so much as it is an Explorer extension; so everything is done by right-clicking on files and folders.
Here's a quick set of instructions that should give you some idea of how it works. The most important part is the description of how the URL is parsed. You need to get that right for it to work with SVN MIOS:
Create a new folder in Windows Explorer, to save the code you will download, and change directory into it.
Right click in the folder, and you will see two new items in the context menu, TortoiseSVN (which is a submenu)', and 'SVN Checkout…'. Below the TortoiseSVN submenu you will see the Repo-Browser, which could be a good tool to test, but instead, we'll go ahead and do a Checkout.
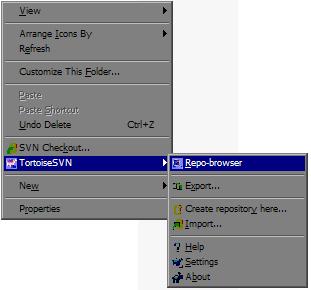
Once you select the 'SVN Checkout' menu, you will be presented with a dialog box titled 'Checkout'. In this window, you can enter the URL to the repository. In our case, there are two ways to do so.
If you are using read-only access, then you should use:
svn://svnmios.midibox.org/mios/playground
If you are using read/write access then you should use:
svn+ssh://<PuTTY Session Name>/mios
For example, mine is svn+ssh://svnmios/mios/playground:
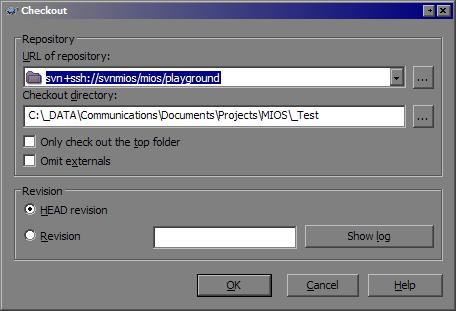
For future reference, the root of the repository is at /mios , and specific paths you need will be published on the forums or can be browsed from there. An example would be svn+ssh://svnmios/mios/tags/midibox_sid_v2_0_test1
Click OK on you have the URL entered, and you'll see a progress window. When it's done it should look like this:
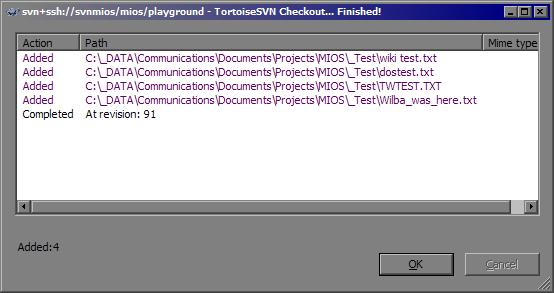
You can now open “C:\… your path here …\mios\playground\wiki test.txt” and add some text. Close and save the file.
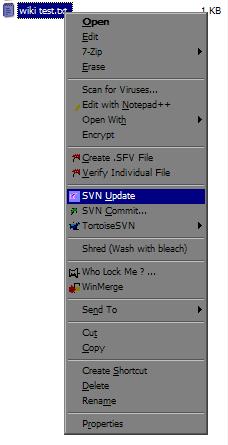
Right-click the file in Windows Explorer, and in the context menu, select 'SVN Commit…'.
A progress window will open, and when it's done, it will look like this:
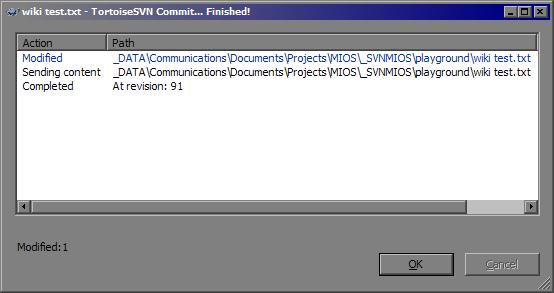
……. and now your changes are online for all to see!!
ActiveState ActivePerl
Perl is required to run 'make dist'. If you are going to be making your own apps, or distribution packages for your own mods, you'll need this.
- Install using defaults
- If you are prompted to restart your computer, then do so (yes, now… I know it's annoying!).
Environment Variables
Normally, the necessary directories are added to your PATH environment variable during the above installations. Sometimes, they aren't. Here's how to check it:
- Minimise any open windows so that you can see the desktop.
- Right-click on 'My Computer', select 'Properties'.
- Click on the 'Advanced' tab, then click 'Environment Variables'
- Under either User or System variables, select the variable 'PATH' and click 'Edit'
- Add these entries if they don't exist (Entries should be separated by semicolons):
- ;C:\PERL\bin\
PATH Environment Variables
You need to add the directory you've created above, when you want to build from SVN sources. This includes running 'make dist' to create a distribution package.
- Minimise any open windows so that you can see the desktop.
- Right-click on 'My Computer', select 'Properties'.
- Click on the 'Advanced' tab, then click 'Environment Variables'.
- Under System Variables, click 'New'.
- For variable name, type “MIOS_PATH”
- For Variable value, type the path to your SVN repository trunk directory, EG D:\mios\trunk
- Click 'OK',
- Under System Variables, click 'New'.
- For variable name, type “MIOS_BIN_PATH”
- For Variable value, type the path to your SVN repository trunk\bin directory, EG D:\mios\trunk\bin
- Click 'OK',
- Ensure your path to your posix_bin director, MSYS\bin directory, or wherever you have your POSIX tools, is in one of the PATH variables. If that makes no sense to you, please read the PATH Environment Variables section of the Core Toolchain doc - or better yet, follow the whole doc and reinstall your toolchain in a way that is known to work well and easily supported ;)
That's all folks! Enjoy!
Before I go, I'd just like to say a big thanks to TK and Twin-X for setting up the backend, and also to the code gurus in the programmer's forum who helped them out and gave the rest of us a clue :D
